
Build a Static List in Pardot
If you’re looking for a quick and easy guide on how to build a static list in Pardot, then look no further, this is exactly what you need.
Ensure you are using Pardot Lightning (The Pardot App located within Salesforce).
STEP 1
CREATE CAMPAIGN
Navigate to Campaigns > Select Dropdown > Select New Campaign

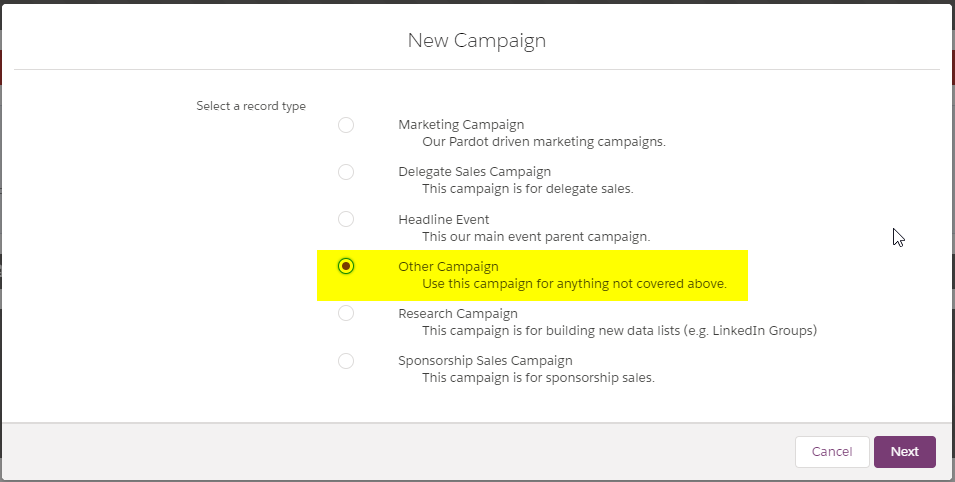
Select Appropriate Campaign Record Type
N.B. For one-off static list builds, we recommend the ‘Other Campaign’ record type.
Fill in as many applicable details as possible and ensure field ‘TYPE’ is OTHER and ‘Active’ is ‘checked’
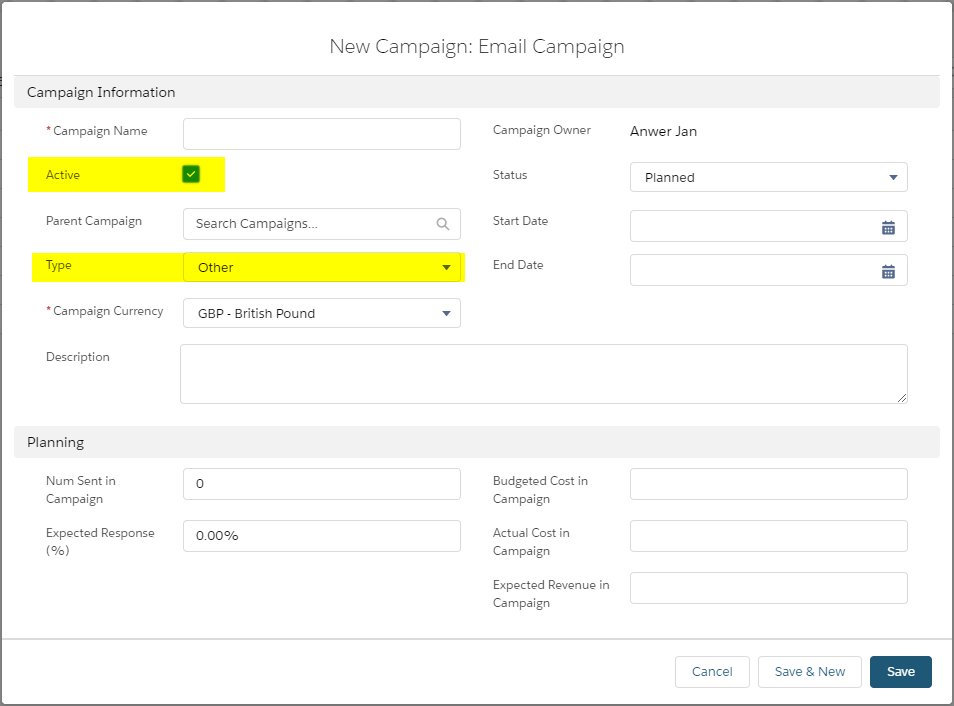
- SAVE CAMPAIGN
STEP 2
RUN REPORT AND ADD TO CAMPAIGN
Use Salesforce Report Builder to put together your list of individuals.
N.B. The report output must include either leads or contacts to be able to allow them to be added via the report builder directly to the campaign

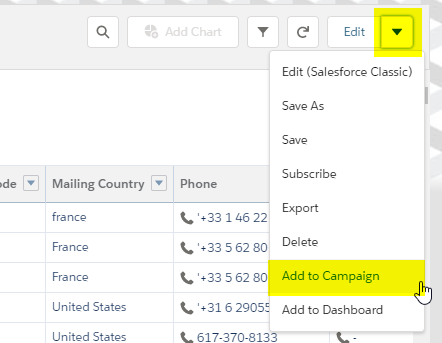
Once report is compiled and saved, navigate to top right corner dropdown, and select ‘add to campaign’
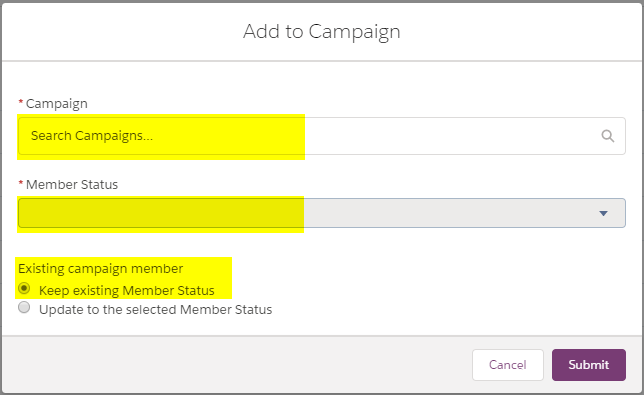
- Select Campaign that was created at Step 1
- Select member status of ‘List member’
- Ensure radio button ‘Keep existing Member Status’ is selected
- Submit
N.B. Depending on Report size, it may take a few minutes for the Campaign to be populated.
You will receive an email notification when complete.
-
STEP 3
CREATE LIST
Navigate to Prospects > Segmentation > Segmentation Lists > + Add List

Name your list and associate it to the applicable folder. Then consider the following options for your use case and select the appropriate value:
- Email Test List – This is used when building an internal test list for email sends
- Dynamic List – This is used for dynamic lists. Covered in a separate article
- Public List – This is used to enable the list to be visible in the email preference centre. Doing so allows it to have a name and description added to it that is customer facing
- CRM Visible – This is used to enable the ability to add prospects directly from the campaign using the button ‘Add to Pardot List’
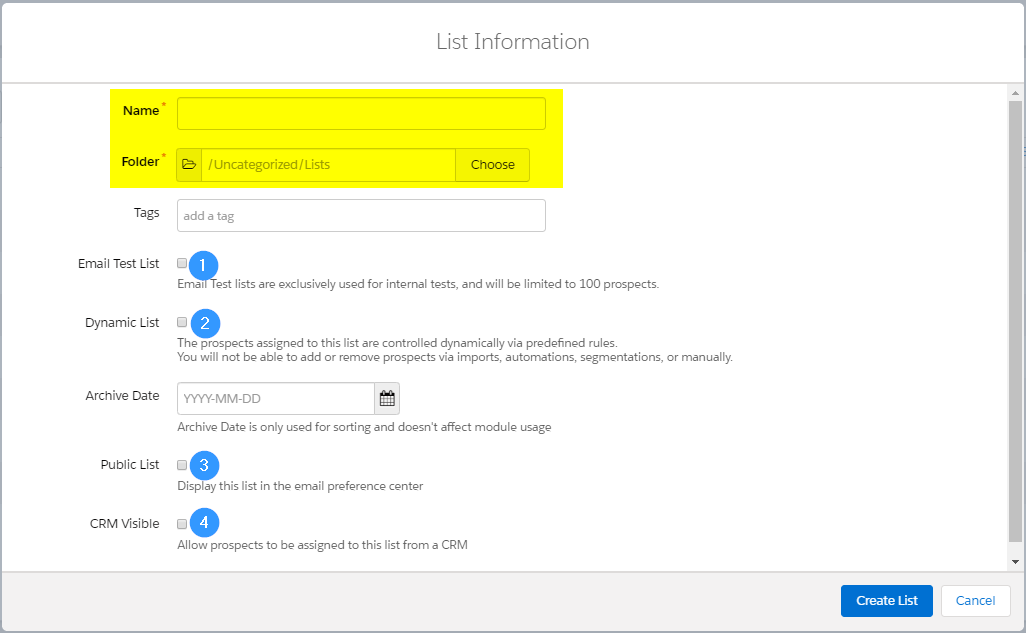
Your list will now be created ready for prospects to be added to it.

STEP 4
USE SEGMENTATION RULE TO POPULATE LIST
Navigate to Segmentation Rules > + Add Segmentation Rule

Name your rule then select Set Rules

- Select ‘+Add New Rule’ and then set the Match to be “Prospect CRM Campaign” “is” and select the campaign we added members to from Step 2
- Select the Action to be “Add prospect to list” and select the list created in Step 3
- Preview the Segmentation Rules to ensure the numbers are as you expect.
- Then select Run Segmentation
Wait for segmentation rule to complete.

CONGRATULATIONS! Now you now know how to build a static list in Pardot.
FIND OUT MORE
We’ve been in the Sales and Marketing Strategy game for longer than we care to remember, but we pride ourselves on the combined exposure our team has had to different B2B markets globally, and the strategic services we offer your business as a result.
If you are looking for Salesforce / Pardot Support with an existing Org or want to know if Salesforce or Pardot is right for you, get in touch with us for a free consultation or simply a chat. We regularly work alongside Start-ups and Enterprises alike, so we’re certain we will find you a path to growth, whatever your plans.
We are open Monday-Friday 9-6pm and have open channels for communication either on our LinkedIn, Twitter or you can simply give us a call on 020 8106 8500.


